
For most people, the idea of messing around with a piece of computer hardware might seem alien in the same way that trying to do anything with a car engine is to me, but recently several devices and kits have been released to the market that mean even the most novice techie, following a set of instructions can create something cool and useful in the real world. Even kids in Coderdojos are messing around with Arduino units and android boxes to see what they can come with. Is it that easy though?
I’m sure everyone at some point in time has looked around their room or house and said they wished they had some gadget to make life easier, or something to automatically close the garage door or whatever. The temptation is always to go off and buy something expensive that would do the job, or buy something that does ten times the things you need just for that one function you need. Take the boxes you buy to make your standard TV into a smart TV. I’d guess that the majority of people will use one or two of the apps and that’s about it.
This is why I’ve found the Raspberry Pi units so interesting.
For those of you who haven’t come across them before, the Raspberry Pi is a really small, cheap computer that you can add pieces to and create your own custom PC or device. The best thing about them is that they’re what’s called open source. This means that there’s no licence fees, you don’t need to update software all the time and you are pretty much free to do with it as you please. All you need now is a good idea, and this is where the simplicity of this sneaky little piece of tech is. The trick is to stop thinking ‘what would I need a tiny customizable computer for’ and instead start thinking, if I could make a little, useful gadget for my house, what would it be?
There are kits and guides out there online for virtually any project you could think of and the fantastic thing is that most of them require little to no programming experience. As long as you follow the online guides you can start with a basic Raspberry Pi board, give it a memory card and a WiFi dongle and hey presto you have a PC with a web browser the size of a pack of cards. This is only the start though. Without needing any welding, soldering or anything more than the most basic of tools you can add LCD screens, camera, motion sensors and much more.
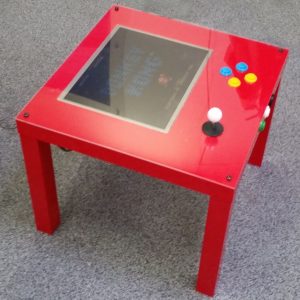
Raspberry Pi IKEA Games Table
So rather than using the device as a spare PC or any of the typical things you would normally associate with a computer, why not think outside the box? And this is what people have done. If you can put a motion sensor in one, why not create a homemade alarm system? Or need to monitor the temperature in a particular room? Add a heat sensor and set up the device to e-mail you or message your phone if it gets too hot or too cold. All of this really cheaply and with just an afternoon’s worth of work.
I’m sure at this point you’re thinking, yeah, but you’re a techie guy, it’s not that easy in real life, and here’s the good news. Even for the most novice person you can get kits that click together like a Lego set and you can download the pre-made software from someone who has more than likely already done the project you’re working on. The community of makers and builders encourages sharing ideas as well as what they’ve created to make the units work or make them do something new.
This is where the other difference lies. Aside from the fact that these devices are meant for you to do something practical, make something fun or learn to code, they encourage and foster an atmosphere online of sharing of ideas and for most things you can find step by step guides better than IKEA’s. What’s even more fun about these is that you can not only customize the parts, you can customize the cases. Again, remember that these devices are smaller than some mobile phones, you can use your creativity to make them feel like part of the surroundings with coloured cases, lights and even if you want to show off, transparent boxes.
What about cost? There are a few variations available, but its a good idea if you’re new to this, to buy a kit. The descriptions will tell you what the kits are good for and give sample projects you can do with them and if you decide to move on to something more complicated everything is modular, so you just buy the additional piece that you need. Unlike a smart phone you can change each piece rather than having to fork out for the whole thing again. Basic kits start from around €50 and this will include everything you’ll need to get the Pi up and running as a basic PC and accessories and parts range in price, but again are relatively cheap. Take the camera attachment for example, approximately €20 for a basic one. Shop around, but this is a good place to start to get ideas for parts. The Pi Hut.

Raspberry Pi Smart Mirror
What about inspiration? Trust me, if you can think of something really cool, chances are someone has done a variation of it. Want to make your home more like Minority Report or other futuristic sci-fi? Why not make a smart mirror that displays the time, weather and your tweets? Or for the retro gamer, I’ve previously mentioned in posts the retro gaming consoles that you can which are ‘official’ such as the Nintendo mini devices, but how about one that could run multiple platforms, or better yet, was built into a table?
These may seem complicated, but the examples above have multiple guides online and if you’re prepared to spend a few hours messing about, the reward is well worth it. Not only that but once you start you’ll begin to think of other ideas and gizmos that you want to build. Now with the Raspberry Pi Zero for example, the units are getting smaller and smaller, the Zero is smaller than a credit card, so you can build gadgets that can be hidden away easily or stuck to the back of your TV for example.
Don’t be daunted with jargon or things that seem complicated if you do decide to give this a go, you’ll very quickly get the hang of it and like anything, begin with something easy and work your way up. Be sure and let me know what you create. By the way, the two images in this post should link to the how-to guides.